Home / Reference / Repurposing HCI nodes
Homelab · salvage · firmwareRepurposing NetApp HCI compute nodes for homelabs
Off-lease NetApp HCI H-series compute nodes show up cheap on the used market — and the homelab community has worked out how to turn them into ordinary servers. This guide covers what HCI nodes are, why they need a firmware transplant, and what you can run once the stock Supermicro/Quanta BIOS and BMC are flashed on.
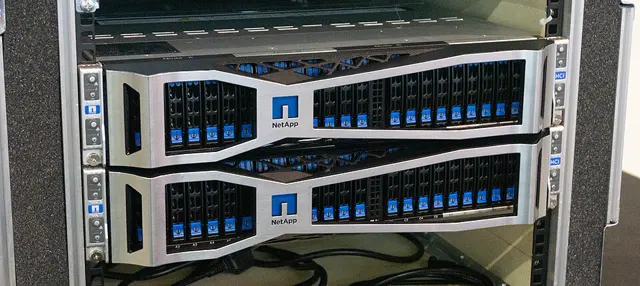
What NetApp HCI is (and what you're actually buying)
NetApp HCI (Hyper Converged Infrastructure) was NetApp's converged platform, sold until it was superseded by the FlexPod and AFF-centric strategy. A standard HCI cluster is made of two node families:
- Compute nodes — the H-series (for example H410C, H610C): 1U/2U servers hosting the VMware (or later Hyper-V) workload layer. These are the interesting ones for homelabs.
- Storage nodes — the S-series (for example S410, S610): all-flash nodes running NetApp Element software (the SolidFire lineage). These are appliances; they are not the salvage target and are covered separately below.
Because HCI was built on commodity server OEMs — the H-series chassis are sourced from Supermicro and Quanta — the underlying hardware is familiar, even if the firmware is not.
Why H-series nodes flood the used market
Enterprise leases run three to five years. When HCI clusters get decommissioned (see the decommissioning runbook for the enterprise side), the compute nodes are often sold in bulk to recyclers, then resold individually. A node that originally cost thousands can go for a few hundred dollars with:
- dual-socket CPUs (often high-core-count Xeon),
- a large memory population (HCI nodes were typically configured with 256 GB to 1 TB),
- NVMe or SAS boot drives, and sometimes local data drives,
- dual or quad 10/25 GbE ports plus a dedicated BMC port.
That's an attractive base for Proxmox, TrueNAS SCALE, or a plain Linux box — if the firmware cooperates.
The firmware wall
NetApp shipped the H-series with a custom BIOS and BMC/IPMI firmware. The practical problems homelab users hit:
- Boot behavior — the customized BIOS may refuse, ignore, or awkwardly handle vanilla boot media, secure-boot keys, and non-NetApp PCIe cards.
- Fan control — the BMC's thermal profile expects a full HCI chassis; on a bare node the fans can run flat-out (loud) or be un-tunable.
- Remote management — the proprietary BMC build may lack the familiar IPMI/KVM console features, or gate them behind HCI-specific tooling.
- Unknowns — version-specific quirks, locked settings, and no public changelog.
None of this is a hard blocker — it just means the node is not yet a "normal server".
The community path: flashing stock firmware
The approach that the r/netapp homelab community has refined (documented in community threads since the nodes first hit the secondhand market, e.g. the August 2026 repurposing deep-dive) is to replace the NetApp firmware with the generic firmware from the original OEM:
- Identify the OEM board. Match the board/chassis to its Supermicro or Quanta equivalent (serial stickers, board part numbers, and BIOS strings all help). This step determines every later download.
- Download the stock BIOS and BMC/IPMI firmware from the OEM's support portal for the matching board model — not from NetApp.
- Flash the BMC first via the existing IPMI/BMC interface (most boards accept a firmware upload over the web UI). Verify the BMC comes back with stock behavior: standard IPMI over LAN, KVM console, sensor readouts, and controllable fan profiles.
- Flash the BIOS using the vendor's preferred method (DOS/EFI flash utility or BMC-driven update). After this, the node should boot like any other server: normal POST, standard setup screens, boot-order control.
- Restore fan control — with a stock BMC the standard IPMI fan-profile commands and thresholds work again, which is the fix for the jet-engine behavior.
- Install your hypervisor or OS. Proxmox VE, TrueNAS SCALE, and vanilla Linux distributions have all been reported working on flashed nodes; network installers and PXE behave normally.
Checklist before you buy
- Compute node, not storage node. H-series = repurposable; S-series = Element appliance (see below). Sellers often mix them.
- Exact model and board revision — the OEM match depends on it. Ask for a photo of the board and stickers.
- Boot device present? Some resellers strip drives. HCI nodes usually have internal M.2/NVMe boot slots — confirm they're populated or buy your own.
- RAM population — 16 GB DIMMs in all slots is common; verify what's installed and the max per the board spec.
- PSU and rails — redundant PSUs are standard; rack rails may be sold separately and can cost as much as the node.
- BMC reachability — if the seller can power it on, ask for an IPMI screenshot or at least confirmation the BMC responds.
What about HCI storage nodes (S-series)?
The S-series runs NetApp Element software (SolidFire lineage) — an appliance OS that manages its own clustered volumes over iSCSI. These nodes are not general-purpose servers: the boot architecture, drive layout, and licensing are tied to the Element stack, and there is no community path (as of this writing) to turn them into vanilla hypervisors the way H-series compute nodes are converted. If your goal is a homelab SAN, options like StorageGRID (object), ONTAP Select, or a plain Linux/TrueNAS box are more practical starting points.
Related pages
- Decommissioning runbook — the enterprise side of retiring NetApp systems safely (data destruction, support, logistics).
- Hardware lineup: AFF, FAS, ASA — the ONTAP platforms, for context on where HCI sat in the portfolio.
- NetApp + Proxmox — running ONTAP-adjacent workloads on the homelab hypervisor most flashed nodes end up running.
- Hardware gallery — photos of HCI and other NetApp systems.